Okay, so we’ve started out small and brainstormed a few creative ways to make gift tags, but at this point in the season you’re probably thinking, “It’s crunch time! I need to get these gifts wrapped!” Well, keep on readin’ because I’m about to share with you a few simple ideas that will take your gifts to the next level.
 Perhaps you’re like me: I have bought some gifts, but I’ve been putting off the wrapping phase because I want for them to be cute. Then I have to ask myself, What is cute? Is it aiming to copy the idealistic gifts I see on social media? Does it involve purchasing the perfect combination of wrapping paper, no matter the price? What is realistic within my timeline and matches my style? As I debate these answers, a few gentle reminders come to mind.
1. Wrapping the gift takes much longer than someone tearing it apart later.
Remember, the wrapping is not the gift. I’ll just go ahead and say it. Unfortunately, only a few are going to appreciate the wrapping equally as you do. But that’s okay! Half of the enjoyment I get from it is just creating. It’s simply another creative outlet to explore. But really, is your uncle going to stop and appreciate the effort you’ve put in? Keep it simple. You don’t want to create a masterpiece that you can’t bear to watch someone rip apart.
2. Don’t force something onto yourself that you’re not.
 Yes, all of those Instagram accounts you follow are beautiful. But look around at your own place. Is it filled with green plants and perfect natural lighting? Do you have gorgeous wood surfaces to take the best pictures of your finalized gifts? If not, do not feel bad! My point is, find a style that fits you. It will feel the most comfortable, it will produce the best results, and you will have the most fun with it! Embrace who you are and let that show in your gifts. You can always appreciate the eye-candy and be inspired by it! There should be no standards to adhere to; give your gift for the right reason.
3. Tis the season to be jolly! Have fun with it!
Something I feel we all could use a reminder of at some point or another – don’t let it stress you out! Again, the only pressure being put on you is most likely coming from yourself; you really have nothing to lose. Be creative! Think outside the box! Literally. My youngest sister once wrapped my mom’s frying pan by covering the entire surface of the pan and handle with wrapping paper. Being without a box, it was very obvious what she was gifting and it brought joy and laughter to my family and to my mom as she opened it in faux-suspense.
The most obvious solution brought the most laughter. Don’t overthink it.
To give you a little inspiration to get started, I’ve put together a few gifts of my own. Grab your gifts and give these a try! (Don’t worry if you have yet to buy your gifts, you still have 5 days! But you should probably stop reading right now and go buy them… Come back when you’re done shopping to try out some of these simple tricks. Best thing is, they’re quick and simple.)
 Best kept secret?
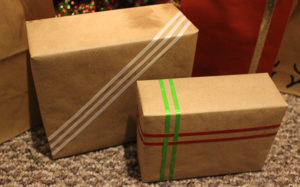
A roll of simple, brown paper. Think about it. Brown: minimal. Blank: canvas with endless possibilities. You could: Paint it. Watercolor it. Stamp it. Hand-letter it. Washi-tape it. Bop it. Sharpie it. Weave it. Macaroni-noodle it. Like I said, endless possibilities. Okay, so maybe this brown paper isn’t a secret, but it’s simplicity is often overlooked! Though probably the oldest trick in the book, it is so in right now. Think minimalistic, vintage, rustic. It can be taken any direction to fit your style.
Sprinkled throughout this post you can see that I’ve tried a variety of methods.
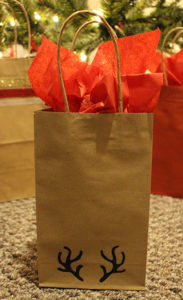
- First, I chose a color palette to stick with. It’s the easiest way to make your gifts look cohesive, like they were meant to find each other! (To continue with the brown paper thing, I visited my local dollar store and bought red and brown paper gift bags. Three in one bundle for only a dollar! What a steal!)
- If some gifts really are meant to be together, play around with wrapping them all individually, and then tying them together with ribbon of sorts. What a cute little bundle of packages that would make! Instant charm and simplicity.
- I played around with the idea of using something that everyone already owns: curling ribbon. Instead of using it for the traditional, but still very cute, curly bow, I opted to weave different colors and try fun geometric patterns across the packages.
- Sharpies! What an easy way to create that wrapping paper you refused to buy! Practice your hand-lettering and write something traditional, leave a personal message, or even draw on your own gift tag! PS: I’m thinking about making hand-lettering an exploration month topic – what do you think?
- Did you like the reindeer antlers? I loved the simplicity of it! I used my stencil that I previewed on Instagram to make it. I’ll have to make it out of something other than paper next time so that it can be reused again! Definitely one of my favorite techniques that could make your gift look more refined!
 Want to take it one step further?
The theme of the gifts shown here are mostly brown paper with red and gold accents. But to stretch my creative mind, I plan on playing around with other themes for the rest of my gifts! Pro-tip: To nail your gifts’ appearance, all gifts that are brought to an event should share the same theme. Just close your eyes and imagine yourself walking through the door carrying a basket full of matching gifts. Wasn’t that fun? You can make that possible!
What is your go-to method when wrapping gifts?! Share your beautiful gifts with me at #TheHWP on social media!
